Wednesday, February 29, 2012

Lacquistry — A Friggin' Circus

Hello lovelies! I have a friggin' awesome polish for you guys today. 

It's Lacquistry's A Friggin' Circus

Lacquistry is one of the first indie brand polishes I've tried and I'm very happy to support an artist in their work. As a former photography student and someone who appreciates handmade objects and art as a whole, I can fully stand behind people who are putting their all and love into making polishes.

Enough gushing!

Direct sunlight.

Shade.


A Friggin' Circus is 12 colours of mini hexagon glitter in a pink base (the description on Jenna's Etsy said it was blue but it's more of a pink/purple colour). I layered 3 coats of A Friggin' Circus over 2 coats of OPI Funky Dunkey from the Shrek Collection and a top coat of SV.

Application on these chunky glitters is tricky. It takes a few more layers to really achieve a covered nail but I was happy with what I was able to do and seeing as this was one of my first times using a chunky glitter like this it came out okay. I'll do better in time. There are bubbles which I'm not happy about but overall I really like this combo. I actually got compliments on them 3 times today while out running errands. :)  The base on AFC is a bit thick but I know I can thin it down and that might help with the application. Next time that'll happen! Hehe.

Overall I'm very pleased with this polish and when I finally start my new job and have some money saved up, I plan on buying more from Jenna. Her polishes all look amazing.

Lacquistry polishes retail for $7.50 USD for a full size .5 fl oz bottles. Her shop is currently closed from the overwhelming response she got when she opened it but you can check her Facebook page for when she announces when she'll reopen.

Until next time~ :)

New Way to Follow

Since Google Friend Connect seems to be going away, especially for those that have their own domain names and aren't blogspot.com URLs. You can now follow me on Bloglovin!

Tuesday, February 28, 2012

China Glaze — Love Marilyn


Here's something that I have been meaning to post for a while. This was a quick manicure I did a while back.

China Glaze Love Marilyn (from the 2011 Eye Candy Collection) is a clear base with small red glitter and medium sized silver glitter. This is a gorgeous colour. I did layer this over another colour, but honestly I don't remember what is was. :/ It was some pinkish colour I have. It may have even been China Glaze 108 Degreez.


I think I did 3 coats of Love Marilyn over my base to create a more opaque look. Since this is a clear base glitter you do have to use a few more coats to create full opaque coverage. Well worth it though. This is a beautiful colour. I know a lot of people say this is comparable to the OPI Muppets Gettin Miss Piggy with it, but while I don't own that one, I can say that these are different. GMPWI has medium/large pink glitters mixed in with the red and silver glitter. And GMPWI doesn't seem as dense as Love Marilyn.

Anyway! I have the China Glaze Electropop and Capital Colors collections coming to me soon! (I had to wait to get my tax return to splurge!) So hopefully I can have some swatches of those to come. For now I'll try to dig around on my computer and see what I have to share. The weather has been so crappy for photos and I hate to waste overcast and rainy days on lovely holographic polishes that won't show their full potential.

Until next time~ :)

Sunday, February 26, 2012

WonderBeautyProducts — Rhinestones and Pearls

Hello you guys!  Today I have a lovely polish from WonderBeautyProducts called Rhinestones and Pearls. I came across her work just searching Etsy for nail polish. This polish was one of many that came up on my search and I was just captivated at how glamorous this polish was.

The below photo is 2 coats of Rhinestones and Pearls over 3 coats of OPI What's With the Cattitude?

Artificial light, no flash.


The concept behind these polishes is that the fully concentrated colour is in a jar all on it's own that you are able to stir up before you apply the polish, so you don't have to go "fishing" for glitter in what is usually a regular polish bottle. The idea is very unique and it is a lot easier to pick up the heavier glitters, but I do see a downside to this. You have to stir the polish after a bit while applying because the glitter does start to settle. And you also have two bottles in front of you to deal with instead of just the one.

Despite all this, this particular polish is beautiful. It's very bridal and glam and personally the two jars/bottles doesn't bother me at all. Application was very good with this. I really only needed one coat layered but I did two just because I wanted a bit more glitter on the nail.

The two bottles: fusion on top, concentrate on bottom.

The WonderBeautyProducts polishes retail for $10USD and she has several to choose from. You can purchase them directly from their Etsy store. Shipping was very quick for my order.

Until next time~ :)

Thursday, February 23, 2012

TonyMoly ­­­­‒ Mars

Another quick post. Mardi Gras is over and thankfully I did not completely destroy my nails when I rode on Fat Tuesday. I did file them down so they aren't as long as they were, but I know if I would have kept them long I would have broken every single one of them on the ride.


Anyway! Today I have a lovely Korean brand polish from Tony Moly called GT03 Mars. It's from their Galaxy Collection. If you don't know me, I happen to love Korea and pretty much everything associated with that country and culture. I listen to Kpop, watch dramas, follow the music shows, and boybands, etc.; I even tried studying the language for a while. It is a dream of mine to be able to visit Seoul in the distant future. (How distant, that's another story.) I digress! 


I came across this brand in the lovely nail blogsphere. I don't remember where I first saw these but it may have been Michelle at ALU. Of course I wanted the entire collection this is from but my wallet does not always agree with my hoarding. Hehe.


Mars is a brown base packed with copper, brown, orange/amber glitter. And maybe a few other colours in there. It's hard to tell but this is a gorgeous colour. It definitely eats top coat like crazy so you might want to add a coat of Gelous and then use a quick-dry top coat like SecheVite but that's all up to you!


Indirect sunlight from window.

Monday, February 20, 2012

Barielle —Gelt Me to the Party

Here's just a quick post because I am so so busy with Mardi Gras and work right now.


Barielle Gelt Me to the Party is a lovely deep yellow gold metallic with bits of pink and green shimmer hidden away.


Application on this is a bit tricky because it is a metallic. But if you're careful you can get this to not have too many brush stroke lines. I got full opacity with two coats and coverage is wonderful.


This is a part of the 2010 Holiday Hustle Winter collection from Barielle so I'm not sure how readily available it is. I purchased this on a Hautelook sale they had several weeks back.


Until next time~


Thursday, February 16, 2012

a england - Princess Tears

Today I have a beautiful gem for you guys. A England put out their new collection called The Legends recently. I had the fortune of being able to place an order with Llarowe and picked up 5 of the 7 in this collection. I'll most likely go back for the other 2 soon as well.


Princess Tears is a beautiful lilac holographic polish with a slight duochrome. It flashes pinky-purple in certain light. 


"As the twin lilac trails of tears stream with an incandescent glow down our doomed heroine's face, they are made even more poignant by luminous grey/ green flashes." - a-england website


In direct sunlight, you can see the holographic beauty of this polish.


 In the shade it just looks like a lilac glitter/shimmer. 
Unfortunately I couldn't capture the duochrome.


Again in the sun you can see a bit of the holographic come out 
but also the true colour of this polish.


Formula on this polish is absolutely perfect. I got full coverage in 2 thin coats. It was a dream to work with. This polish goes where you want it to. I barely had any clean up to do on this manicure. I cannot rave enough about how much I loved this polish. Heh.

A England polishes can be purchased from their website for £9.00 each or from Llarowe for $12.00 each. The bottles are 13ml.


Also sorry for the pictures! I actually took these with my phone camera since my DSLR is still acting insane.


Until next time~ :)

Tuesday, February 14, 2012

Valentine's Day Manicure!

Happy Valentine's Day! Whether you celebrate it or not, every day is a day that you should express love to your significant other and/or family and friends. :) I have a little manicure that I did in celebration of this day of love. It didn't come out exactly as I wanted it to but I liked it well enough.


My original intention was to do all my nails with the little hearts wallpaper that rebecca likes nails posted. Unfortunately, I freaked out thinking I'd need to do 5 coats of the light pink Revlon polish and decided to go with China Glaze Strawberry Fields as my main colour. My luck was that Strawberry Fields needed 3 coats too to hide VNL. -_-;;

So I went a little crazy and did some things and didn't like them and then changed them up again. But this was the final result!


It definitely doesn't have as much going on as I wanted it too. I just think they came out too plain.

Honestly, I'll probably just paint them a solid colour tonight before I go out with my boyfriend but for the day before and day of Valentine's Day this worked for me. I just wish my skills for nail art were much better than they actually are. I just have to keep practicing!

All colours used:

Revlon Pink Chiffon
China Glaze Strawberry Fields
A England Princess Tears


Now I know my pictures are not very good this time around. I am quite sad to say that I think after 7 years my beloved DSLR Holmes is finally kicking the bucket. I am having more errors with it than ever after my vacation incident  — a squall came while we were on a cruise and my bag got soaked because it was left outside with the rest of our party while I went to grab food. My camera didn't even seem to get wet at all but ever since it's been acting insane. :(((

I've been trying to save up for a new camera but DSLRs don't come cheap and I definitely want to upgrade to something more prosumer than consumer. Enough camera babbling!

I'm hoping to have another post up this week, but with how crazy things are with Mardi Gras, I'm not sure I will. Thanks for reading!

Until next time~ :)

Friday, February 10, 2012

Icing Magnetix — Blue & Grey

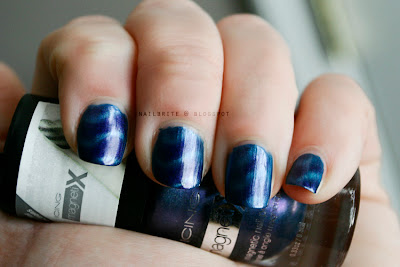
I finally managed to get my hands on some of these awesome magnetic polishes. I got these from Icing as soon as I heard they were putting some out for relatively affordable prices. Icing doesn't have names for these polishes so I'm just calling them Blue and Grey. Lol.


First off is the Blue magnetic polish. The formula on these is good. One coat and you pretty much have full coverage. Unfortunately I got a really crappy brush on this colour, so if you pick these up make sure you check out the brushes before you buy them! It was like painting with a mop. :/ I did do one coat for a base with these and then did one wet coat and used the magnet. It actually goes pretty fast considering you have to do one finger at a time. The instructions say to hold the magnet over the wet polish for 10-15 seconds but I actually held it over for about twice that and found the design came out stronger. This polish came with the wavy magnet top and when the design pulls the polishes purple pigment get pulled into the design, so you're left with a blurple wave.


Second we have the Grey magnetic polish. This had the same formula as the Blue polish. The brush on this one was actually good so I didn't have any issues actually applying the polish. The grey polish is actually a black/grey colour. the magnet pulls the black pigment together creating the design. this one is pretty awesome especially since it has those bits of silver glitter in it.

As you can see from the designs you can invert the magnet so that the design goes the opposite way. You can probably play around with it more to create the design in several different directions if you wanted to as well.

Overall these are really cool polishes, a bit time consuming, but if you are willing to set aside the extra time, I beleive these are definitely worth it! These Icing Magnetix polishes retail for $9 USD and can be found at your local Icing.

Until next time~ :)

Wednesday, February 8, 2012

Essence - Polka Dots

Sorry I haven't posted in forever. I've been quite sick for the last two weeks. I found out I have mono (eeek!) but thankfully I only had a very mild form of it and was able to fight it off without going to the hospital. Now I'm just reeling from the antibiotics I was on during the time since those are making me feel sick now too. :/ I just can't catch a break!

Anyway.... 


Today we have a mani I did last weekend. I was originally going to alternate colours on all fingers but since I wasn't feeling 100% I just did an accent nail. It came out pretty okay. I find that when I do smaller dots my polka dots come out so much better than the bigger ones. I also had a lot of flyaways since my polish was drying really fast and was getting stringy while I was dotting.

Colours used were:
Essence Break Through

Essence Enchanted Fairy


Formula on both of these was very good. Only 2 thin coats were used to full opacity. I thought I'd need more with Enchanted Fairy since it's such a light colour, but nope, just 2 coats.


I then used the number 4 Osaka dotting tool to dot the alternating colour on my fingers. I need to learn to do this better though. Sometimes I do my dots really well and other times I don't. Lol. Practice only makes perfect though!


Anyway, I hope to have more posts coming soon. Just being sick and I have a new job starting up soon which will probably take up a lot of my time, but I will try to at least get 1-2 posts out a week. Lord knows I have enough polish to keep me going for a while!


Until next time~ :)

Saturday, February 4, 2012

Barielle - Buddha-ful


Barielle Buddha-ful


Buddha-ful is a pink/beige sheer base with blue-green flakies. Not sure if I have an older version but the Barielle website describes Buddha-ful as a "beige with soft baby pink / blue / light grey foil" — whatever that means.


I layered two coats of this over a China Glaze pink that I got for Breast Cancer Awareness (it was a two pack with Seche Vite) at Sally Beauty Supply called Go Go Pink. My base was a bit draggy so that's where those horrible spots come from. I'm usually not into colours like this but I think for a soft, feminine manicure, this works wonderfully.


Buddha-ful would probably look good layered over a darker or brighter colour too, but the milky base would definitely deflect away from the base colour. Formula wise this is a really good polish. The flakies aren't too dense but they aren't too sparse either.


I'll definitely be trying this polish again in the future.


Until next time~ :)

Wednesday, February 1, 2012

Speciallità Hits no Olimpo Collection (3)

Ares

Zeus

Apolo

Since I posted Ares before, I wanted to post all the colours I received from Llarowe when I placed my order for this collection. I would have bought more but unfortunately I don't have a money tree growing in my backyard. Lol. (Plus a couple I wanted were out of stock at the time.)

These are all 2 coats. The formula on these is amazing, no special base coat needed like other holo polishes. And these are so vibrant.

Anyway, dear readers, I hope you enjoy these swatches. 

Until next time~ :)